For the initial steps follow these steps in setting up the HubSpot Scheduling page for Meetings.
A Group Meetings link shows the overlapping availability for the team members selected. Once your link has been created, share it with your contact. They’ll be able to select a time that works for them, and everyone on your team who you’ve invited to the meeting will get an invite saved to their calendar.
Round Robin Meetings links facilitate scheduling when there isn’t a designated sales rep. A Round Robin Meetings link shows combined availability across a team, so a prospect can schedule a meeting with whoever is available.
Reference from HubSpot
Team members
(Sales Hub or Service Hub Starter, Professional, or Enterprise only)
Select which team members you want to include in the group or round robin meeting.
- In the top right, click Add team member.
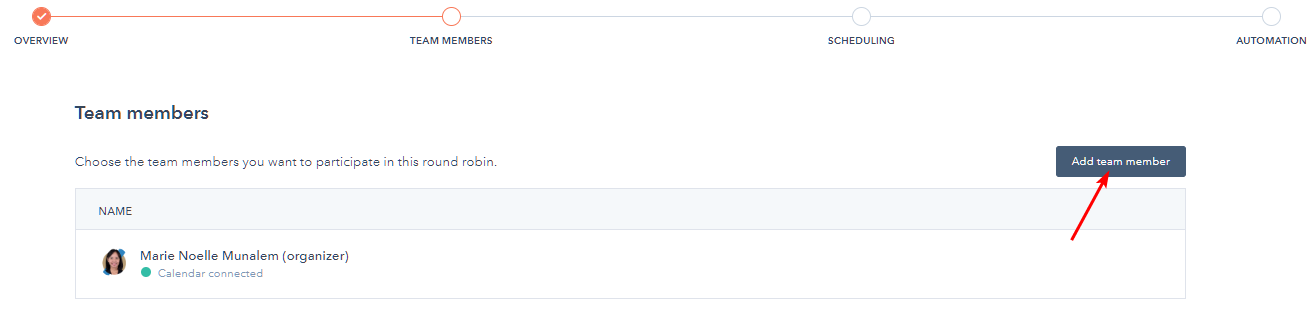
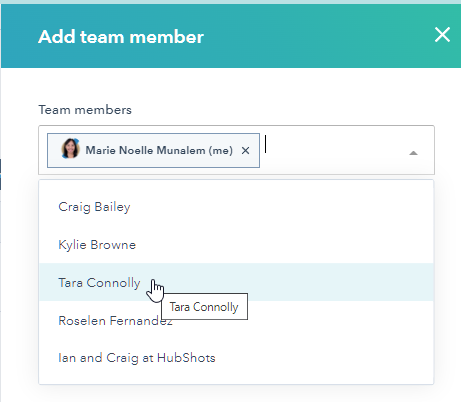
- In the right panel, click the Team members dropdown menu and select another team member, then click Confirm. If a user's calendar is disconnected, an alert will appear below their name and the Check availability switch will be turned off. Then click Next.
Please note: your team member must have activated the meetings tool, which they can do by navigating to the meetings tool and clicking Get started, and have an assigned Sales Hub or Service Hub paid seat to be added to a group or round robin meeting. If a user's calendar is not connected, they can still be added to the link, but this may impact the available times that appear on the scheduling page. Learn more about how round-robin and group meeting availability works.
Scheduling experience
Please note: once the scheduling page is created, the user that created a group meeting cannot be removed as team member. However, a user that created a round robin meeting can remove themselves as a team member.
Customize your meeting availability and booking form on the Scheduling experience page.
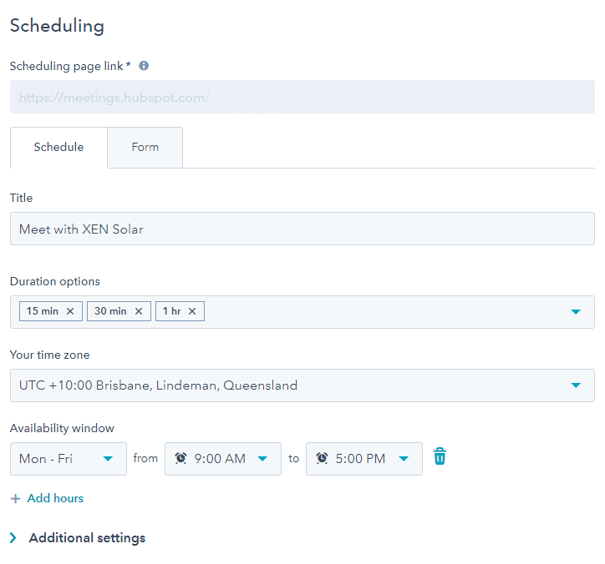
- At the top, edit the scheduling page URL. This is the link that contacts will use to book meetings on your calendar.
Please note: you can only use alphanumeric characters, hyphens, or underscores in the scheduling page URL. Other special characters are not supported and cannot be entered into the text field.
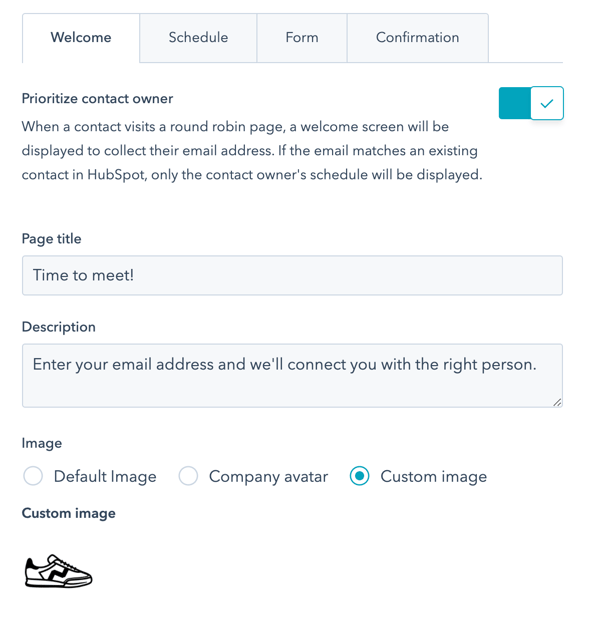
- If you're creating a round-robin meeting, on the Welcome tab, you can choose to display the contact owner's scheduling page. If you don't want to prioritize the contact owner's scheduling page, skip to the Schedule tab.
- To display the contact owner's scheduling page when the known contact books a meeting, click to toggle the Prioritize contact owner switch on. Learn more about how this setting impacts meeting availability.
- With the Prioritize contact owner setting turned on, a welcome screen will appear where the contact can enter their email address before accessing the scheduling page:
- In the Page title field, enter the text that appears on the welcome screen.
- In the Description field, enter text to explain why you're asking for the visitor's email address.
- To customize the image that appears on the welcome screen, in the Image section, select an image option.
- Default image: the default meetings icon provided by HubSpot will appear.
- Company avatar: the company avatar associated with the email domain of the user who created the scheduling page. This is populated using HubSpot Insights.
- Custom image: upload a custom image selected from the file manager. Hover over the avatar and click the edit pencil icon, then select Change photo. In the right panel, select an image.
- On the Schedule tab, you can customize the following:
- Title: enter the name that will appear above the calendar on the scheduling page.
- Duration: the length of time visitors can book you for. Click + Add duration to add more options.
- Time zone: click the Time zone dropdown menu and select your time zone. This is the time zone that your availability is based on.
- Available times: use the dropdown menus to set the days of the week and duration of your available time slots. Click + Add hours to add additional time slots.
Please note: your scheduling page's available times will appear in the contact's time zone settings. For example, if the contact's computer is set to Pacific time, the times will appear in Pacific time. The contact's calendar settings determine the date and time of the calendar event sent to the contact after booking a meeting.
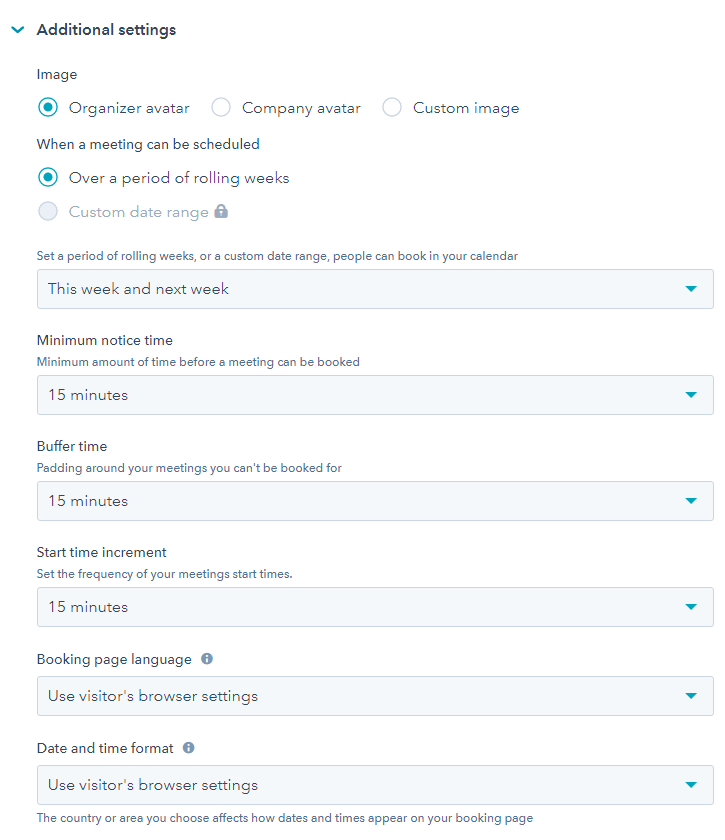
- To see additional customization options, click to expand the Additional settings section. Here you can customize the following:
- Image: this image will appear at the top of your scheduling page. Select an image option:
- Organizer's avatar: the meeting organizer's avatar, set in their user profile and preferences, will appear. This option is only available when creating a one-on-one scheduling page.
- Company avatar: the company avatar associated with the email domain of the user who created the scheduling page will appear. This is populated using HubSpot Insights.
- Custom image: upload a custom image selected from the file manager. Hover over the avatar and click the edit pencil icon, then select Change photo. In the right panel, select an image.
- When a meeting can be scheduled: enter the number of weeks from now that people can book time on your calendar. If you are creating a scheduling page for an event or conference, you can specify a custom date range for booking. Select the Over a period of rolling weeks or Custom date range (users with assigned Sales Hub paid seats only) radio button, then select the number of weeks or use the date picker fields to set your time range. A custom date range cannot be longer than 10 weeks.
- Minimum notice time: click the dropdown menu to select the minimum amount of time before a meeting that someone can book time with you.
- Buffer time: click the dropdown menu to select the amount of buffer time between each of your meetings. The buffer time prevents meetings from being booked too closely together. For example, if you have a meeting from 1:00 - 1:30pm and have a buffer time of 30 minutes, the next available meeting time would be 2:00pm.
- Start time increment: set the frequency of your meeting start times. For example, if you are available between 10:00am and 12:00pm for a 60 minute meeting and your start time increment is 15 minutes, a prospect can book 60 minutes with you at 10:00am, 10:15am, 10:30am, and so on.
- Booking page language: select the language that the scheduling page should appear in. If a visitor’s browser settings can’t be detected, your scheduling page will appear in English.
- Date and time format: the date and time will be formatted in the same language selected for the booking page language.
- Image: this image will appear at the top of your scheduling page. Select an image option:
- Click the Form tab to customize the form contacts will see when booking a meeting with you.
- By default, contacts will be required to enter their First Name, Last Name, and Email when booking. If you are a paid Sales Hub or Service Hub user you can add additional questions. Keep in mind that any additional form fields that are added will be included in the calendar event invite and event description.
- To add a simple text field question, click Custom question. Enter a question, then click Save. To make the field optional, clear the Required checkbox to the right of the field.
- To add an existing contact property as a field, click Contact property. This allows you to add different field types to your form. If you need to create a new property for this field, learn how to create custom properties. Select a contact property from the dropdown menu, then click Save. To make the field optional, clear the Required checkbox to the right of the field.
Please note: you cannot add a file upload field to your meetings form
- To add a CAPTCHA challenge to the scheduling page to prevent spam submissions, click to toggle the CAPTCHA (spam prevention) switch on.
- If you have GDPR enabled in your account, any scheduling pages created moving forward will default to GDPR ON. The scheduling page will show the default Privacy & Consent text you have set up in your account settings. To customize your Privacy & Consent (GDPR) options for this scheduling page, click Customize:
- You can capture a contact's consent to communicate to a specific subscription type, or capture legitimate interest on your scheduling page. In the Customize marketing consent panel, select Consent or Legitimate interest from the dropdown menu.
- Consent: edit the communication consent text, then add additional subscription types/checkboxes to allow visitors to consent to communication from multiple subscription types on a single scheduling page. Click + Add another checkbox, then select a consent type and edit the text that will appear next to the checkbox.
- Legitimate interest: select a lawful basis from the dropdown menu. To add more subscription types so you can capture multiple subscription types implicitly, click + Add another subscription, then click the Subscription type dropdown menu and select a subscription type. The default subscription that you select in meetings is "one-on-one" communication. It's an internal subscription type in your HubSpot account.
- Edit the scheduling page's privacy and consent text. Any changes made to an individual scheduling page's Privacy & Consent options will override the default text set in your account settings.
- To see how the consent options will render, click the Preview tab.
- You can capture a contact's consent to communicate to a specific subscription type, or capture legitimate interest on your scheduling page. In the Customize marketing consent panel, select Consent or Legitimate interest from the dropdown menu.
- To access additional form settings, click to expand the Additional settings section:
- If you do not want form fields on the booking page to pre-populate with known information when a contact returns to your site, click to toggle the Pre-populate fields with known values switch off. Turning this setting off will automatically turn off the Auto-submit form when all fields are pre-populated setting.
- To automatically submit the form when the form fields pre-populate with known data, click to toggle the Auto-submit form when all fields are pre-populated switch on.
- Users with an assigned Sales Hub or Service Hub paid seat can redirect contacts to a specific website page, landing page, or external page after they book a meeting. To customize the contact's experience after booking, click the Confirmation tab:
- Select the Redirect to another page option. If you’ve installed ad network pixels, this redirect supports tracking meeting bookings with external networks like Google and Facebook.
- To select a HubSpot page, click the dropdown menu and select a page.
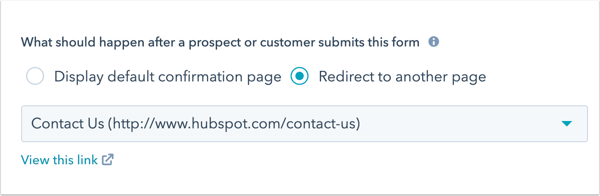
- To redirect to an external page, click Add external link. In the dialog box, enter the URL, then click Add.
- When you're done editing your scheduling options, click Next.
Automation
On the Automation page, you can turn off the automatic booking confirmation email or add additional reminder emails to be sent out before the meeting.
Please note: You cannot edit the content of the confirmation or reminder emails.
- By default, a confirmation email will be sent when someone books a meeting using this scheduling page. To turn this off, click to toggle the Confirmation email switch off.
- To send reminder emails before a meeting, click to toggle the Pre-meeting reminder switch on.
- To select how many weeks, days, hours, or minutes before the meeting that an email should be sent out, enter a number in the text field, then click the Scheduled reminder email dropdown menu and select a time measure.
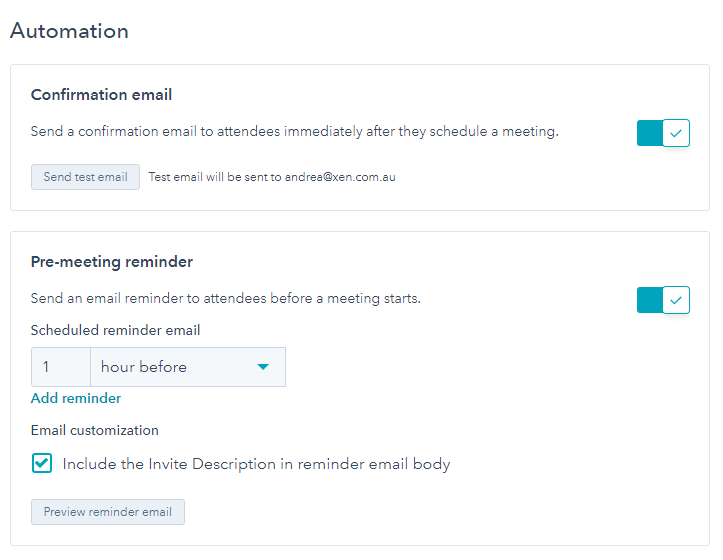
- You can add up to three reminder emails. To add additional reminder emails, click Add reminder. To delete a reminder, click the delete icon.
- To include the invite description in the reminder email, select the Include the Invite Description in reminder checkbox.
- To preview the email your contacts will receive, click Preview reminder email. The language of the email will match the language selected in the Booking page language dropdown menu.
- To select how many weeks, days, hours, or minutes before the meeting that an email should be sent out, enter a number in the text field, then click the Scheduled reminder email dropdown menu and select a time measure.
- Click Done.
You can now share a meeting link with your contacts so they can access the scheduling page and book time with you. In the Type column, a One-on-One, Group, or Round Robin label will appear next to the meeting name, and the organizer's name will be listed below the label.
Please note: for round robin meetings, the reminder email will be sent from the HubSpot user who has been booked for the meeting with the contact, not the HubSpot user who created the scheduling page.
Users with an assigned Sales Hub or Service Hub paid seat can also customize the company logo, company information, and default colors that display on your scheduling page in your account settings. Changes made here will also apply to your documents and quotes. Learn how to edit your company branding for HubSpot's sales tools.
Should you need to update or edit your scheduling pages in the future, you can follow this KB Article.
See more information from HubSpot.